好程序员-千锋教育旗下高端IT职业教育品牌
官方微信
2020-06-15
page 页面 webpack 'page
好程序员web前端培训分享kbone高级-事件系统:1、用法,对于多页面的应用,在 Web 端可以直接通过 a 标签或者 location 对象进行跳转,但是在小程序中则行不通;同时 Web 端的页面 url 实现和小程序页面路由也是完全不一样的,因此对于多页开发最大的难点在于如何进行页面跳转。

1.1 修改 webpack 配置
对于多页应用,此处和 Web 端一致,有多少个页面就需要配置多少个入口文件。如下例子,这个应用中包含 page1、page2 和 page2 三个页面:
// webpack.mp.config.js
module.exports = {
entry: {
page1: path.resolve(__dirname, '../src/page1/main.mp.js'),
page2: path.resolve(__dirname, '../src/page2/main.mp.js'),
page3: path.resolve(__dirname, '../src/page3/main.mp.js'),
},
// ... other options
}
1.2 修改 webpack 插件配置
mp-webpack-plugin 这个插件的配置同样需要调整,需要开发者提供各个页面对应的 url 给 kbone。
module.exports = {
origin: 'https://test.miniprogram.com',
entry: '/page1',
router: {
page1: ['/(home|page1)?', '/test/(home|page1)'],
page2: ['/test/page2/:id'],
page3: ['/test/page3/:id'],
},
// ... other options
}
其中 origin 即 window.location.origin 字段,使用 kbone 的应用所有页面必须同源,不同源的页面禁止访问。entry 页面表示这个应用的入口 url。router 配置则是各个页面对应的 url,可以看到每个页面可能不止对应一个 url,而且这里的 url 支持参数配置。
有了以上几个配置后,就可以在 kbone 内使用 a 标签或者 location 对象进行跳转。kbone 会将要跳转的 url 进行解析,然后根据配置中的 origin 和 router 查找出对应的页面,然后拼出页面在小程序中的路由,最后通过小程序 API 进行跳转(利用 wx.redirectTo 等方法)。
2、案例
在 kbone-advanced 目录下创建 02-mulpages 目录。本案例在这个目录下实现。
2.1 创建 package.json
cd 02-mulpages
npm init -y
编辑 package.json:
{
"name": "01-env",
"version": "1.0.0",
"description": "",
"main": "index.js",
"scripts": {
"mp": "cross-env NODE_ENV=production webpack --config build/webpack.mp.config.js --progress --hide-modules"
},
"dependencies": {
"add": "^2.0.6",
"vue": "^2.5.11"
},
"browserslist": [
"> 1%",
"last 2 versions",
"not ie <= 8"
],
"devDependencies": {
"babel-core": "^6.26.0",
"babel-loader": "^7.1.2",
"babel-preset-env": "^1.6.0",
"cross-env": "^5.0.5",
"css-loader": "^0.28.7",
"file-loader": "^1.1.4",
"html-webpack-plugin": "^4.0.0-beta.5",
"mini-css-extract-plugin": "^0.5.0",
"optimize-css-assets-webpack-plugin": "^5.0.1",
"stylehacks": "^4.0.3",
"vue-loader": "^15.7.0",
"vue-template-compiler": "^2.6.10",
"webpack": "^4.29.6",
"webpack-cli": "^3.2.3",
"mp-webpack-plugin": "latest"
},
"keywords": [],
"author": "",
"license": "ISC"
}
安装依赖包:
npm install
2.2 配置 webpack
在 02-mulpages 目录下创建 build 文件夹,在文件夹下创建 webpack.mp.config.js 文件,内容如下:
const path = require('path')
const webpack = require('webpack')
const MiniCssExtractPlugin = require('mini-css-extract-plugin')
const { VueLoaderPlugin } = require('vue-loader')
const OptimizeCSSAssetsPlugin = require('optimize-css-assets-webpack-plugin');
const TerserPlugin = require('terser-webpack-plugin')
const MpPlugin = require('mp-webpack-plugin') // 用于构建小程序代码的 webpack 插件
const isOptimize = false // 是否压缩业务代码,开发者工具可能无法完美支持业务代码使用到的 es 特性,建议自己做代码压缩
module.exports = {
mode: 'production',
entry: {
page1: path.resolve(__dirname, '../src/page1/main.mp.js'),
page2: path.resolve(__dirname, '../src/page2/main.mp.js'),
page3: path.resolve(__dirname, '../src/page3/main.mp.js'),
},
output: {
path: path.resolve(__dirname, '../dist/mp/common'), // 放到小程序代码目录中的 common 目录下
filename: '[name].js', // 必需字段,不能修改
library: 'createApp', // 必需字段,不能修改
libraryExport: 'default', // 必需字段,不能修改
libraryTarget: 'window', // 必需字段,不能修改
},
target: 'web', // 必需字段,不能修改
optimization: {
runtimeChunk: false, // 必需字段,不能修改
splitChunks: { // 代码分隔配置,不建议修改
chunks: 'all',
minSize: 1000,
maxSize: 0,
minChunks: 1,
maxAsyncRequests: 100,
maxInitialRequests: 100,
automaticNameDelimiter: '~',
name: true,
cacheGroups: {
vendors: {
test: /[\\/]node_modules[\\/]/,
priority: -10
},
default: {
minChunks: 2,
priority: -20,
reuseExistingChunk: true
}
}
},
minimizer: isOptimize ? [
// 压缩CSS
new OptimizeCSSAssetsPlugin({
assetNameRegExp: /\.(css|wxss)$/g,
cssProcessor: require('cssnano'),
cssProcessorPluginOptions: {
preset: ['default', {
discardComments: {
removeAll: true,
},
minifySelectors: false, // 因为 wxss 编译器不支持 .some>:first-child 这样格式的代码,所以暂时禁掉这个
}],
},
canPrint: false
}),
// 压缩 js
new TerserPlugin({
test: /\.js(\?.*)?$/i,
parallel: true,
})
] : [],
},
module: {
rules: [
{
test: /\.css$/,
use: [
MiniCssExtractPlugin.loader,
'css-loader'
],
},
{
test: /\.vue$/,
loader: [
'vue-loader',
],
},
{
test: /\.js$/,
use: {
loader: 'babel-loader',
options: {
presets: ['env']
}
},
exclude: /node_modules/
},
{
test: /\.(png|jpg|gif|svg)$/,
loader: 'file-loader',
options: {
name: '[name].[ext]?[hash]'
}
}
]
},
resolve: {
extensions: ['*', '.js', '.vue', '.json']
},
plugins: [
new webpack.DefinePlugin({
'process.env.isMiniprogram': true, // 注入环境变量,用于业务代码判断
}),
new MiniCssExtractPlugin({
filename: '[name].wxss',
}),
new VueLoaderPlugin(),
new MpPlugin(require('./miniprogram.config.js')),
],
}
在 02-mulpages/build 文件夹下创建 miniprogram.config.js 文件,内容如下:
module.exports = {
origin: 'https://test.miniprogram.com',
entry: '/',
router: {
page1: ['/a'],
page2: ['/b'],
page3: ['/c'],
},
redirect: {
notFound: 'page1',
accessDenied: 'page1',
},
generate: {
appEntry: 'miniprogram-app',
// 构建完成后是否自动安装小程序依赖。'npm':使用 npm 自动安装依赖
autoBuildNpm: 'npm'
},
runtime: {
cookieStore: 'memory',
},
app: {
navigationBarTitleText: 'kbone-multiple-pages',
},
global: {
share: true,
},
pages: {
page1: {
extra: {
navigationBarTitleText: 'page1',
},
},
},
projectConfig: {
appid: '',
projectname: 'kbone-multiple-pages',
},
packageConfig: {
author: 'Felixlu',
}
}
2.3 编写三个页面
在 /src/ 下创建 page1, page2, page3 三个文件夹,在文件夹里创建三个页面,每个页面由 App.vue 和 main.mp.js 两个文件组成。
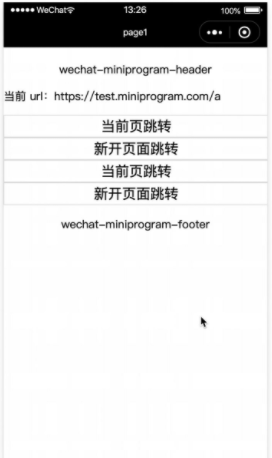
1、page1 页面
/src/page1/App.vue 内容:
当前 url:{{url}}
当前页跳转
新开页面跳转
当前页跳转
新开页面跳转
/src/page1/main.mp.js 内容:
import Vue from 'vue'
import App from './App.vue'
export default function createApp() {
const container = document.createElement('div')
container.id = 'app'
document.body.appendChild(container)
return new Vue({
el: '#app',
render: h => h(App)
})
}
/src/common/Header.vue 内容:
wechat-miniprogram-header
/src/common/utils.js 内容:
export function printf(str) {
console.log('common/utils.js --> ', str)
}
/src/common/Footer.vue 内容:
wechat-miniprogram-footer
2、page2 页面
/src/page2/App.vue 内容:
当前 url:{{url}}
回到首页
回到首页
relaunch
/src/page2/main.mp.js 内容:
import Vue from 'vue'
import App from './App.vue'
export default function createApp() {
const container = document.createElement('div')
container.id = 'app'
document.body.appendChild(container)
return new Vue({
el: '#app',
render: h => h(App)
})
}
3、page3 页面
/src/page3/App.vue 内容:
当前 url:{{url}}
回到上一页
关闭当前窗口
/src/page3/main.mp.js 内容:
import Vue from 'vue'
import App from './App.vue'
export default function createApp() {
const container = document.createElement('div')
container.id = 'app'
document.body.appendChild(container)
return new Vue({
el: '#app',
render: h => h(App)
})
}
2.4 小程序端效果预览
npm run mp


 扫码开启架构师蜕变之旅 >>
开班时间:2021-04-12(深圳)
开班盛况开班时间:2021-05-17(北京)
开班盛况开班时间:2021-03-22(杭州)
开班盛况开班时间:2021-04-26(北京)
开班盛况开班时间:2021-05-10(北京)
开班盛况开班时间:2021-02-22(北京)
开班盛况开班时间:2021-07-12(北京)
预约报名开班时间:2020-09-21(上海)
开班盛况开班时间:2021-07-12(北京)
预约报名开班时间:2019-07-22(北京)
开班盛况
Copyright 2011-2023 北京千锋互联科技有限公司 .All Right
京ICP备12003911号-5
 京公网安备 11010802035720号


